First examine your house and carefully choose a central wiring "head-end" or "hub" location. Since the chimney in my house runs from basement to roof, it provides a conduit to nearly the whole house - the lower level via the basement and the upper level via the attic. I decided to put the hub in the basement by the chimney for various reasons: using otherwise unusable space, avoiding hot summer temperatures in the attic, ease of access, yet hidden away.
Since I had to do the labor of cutting holes, routing and pulling wire, I decided to pull a fuller spectrum of wire: (of course) Cat5 for 10/100BT, plus RG6 for CATV, and speaker wire. While we do intend to move toward Ethernet for everything, we aren't quite there, yet.
Pulling the wire for the first 7 rooms took 12 hours. The 8th (living) room took a whole day and required cutting 3 holes in the ceiling of the laundry closet, including half an hour to cut out a nail. I also pulled wire to the garage.
"Keystone" jacks provide flexible wall plate and patch panel mounting.
While I initially installed a RJ45/110 patch panel, I replaced it with a
keystone patch panel that integrates Cat5, coax, and speaker wire.
The keystones allow you to easily rearrange the patch panel and to untangle
wires without having to repunch.
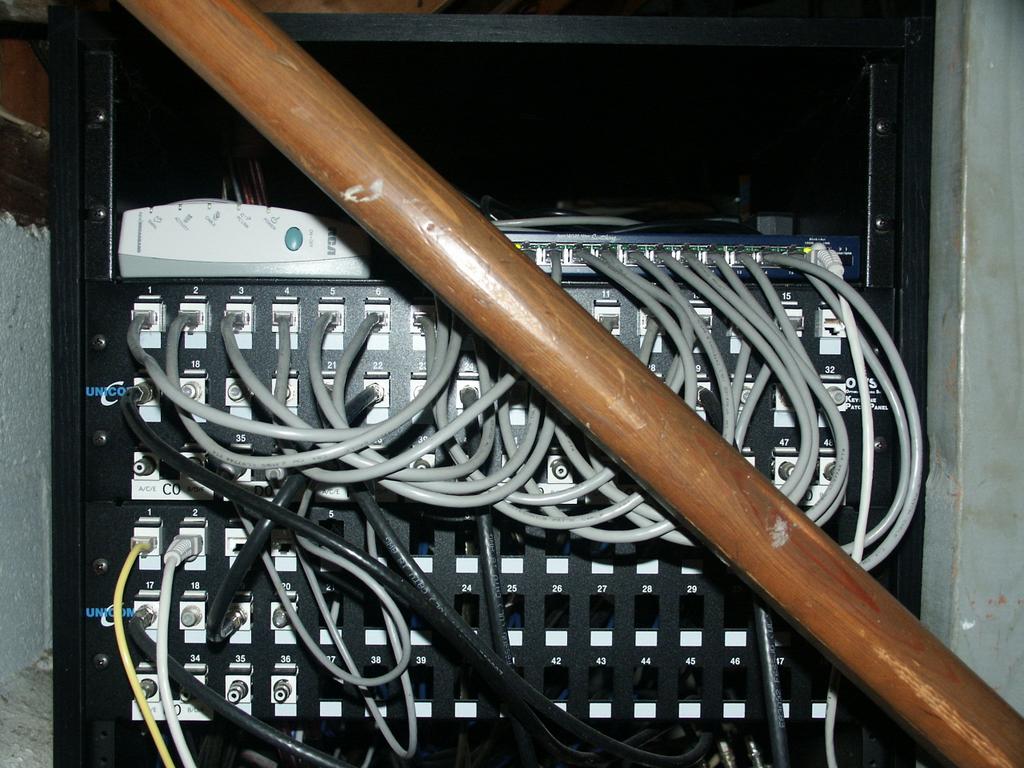
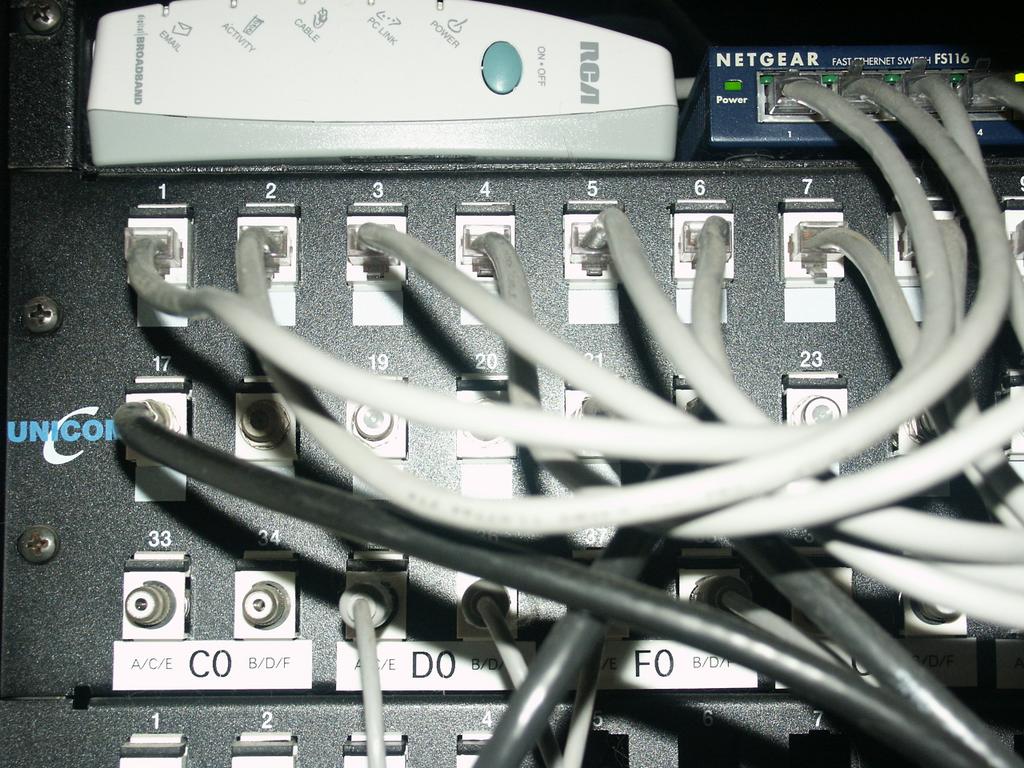
Here's a photo of the keystone patch panel, and a close-up showing details of the port layout and naming plan. Click on an image for a larger version.
For the wall plate wiring, I used Leviton QuickPort parts. If I were to do it over again, I'd consider Unicom keystone parts as they are considerably less expensive, but I didn't discover them in time. On the other hand, my wife likes the gold plated Leviton connectors.
Warning: the Leviton Mounting Brackets that I bought have (or rather had) metric screw thread. I had to buy a standard (#6?) tap to re-tap all of the bolt holes. The faceplates came with standard (#6?) bolts. The two Mounting Boxes also came with metric thread, but contained matching bolts.
6 Port Flush Mount Wall Plate
| A - RJ45 Cat5 | B - RJ45 Cat5 |
| C - F connector RG6 | D - F connector RG6 |
| E - RCA phono black stripe speaker | F - RCA phono red stripe speaker |
| Code | Description | Length |
| L | Living room | 36 ft. |
| K | Kitchen | 32 ft. |
| D | Dining room | 32 ft. |
| F | Family room (den) | 34 ft. |
| M | Master bedroom | 49 ft. |
| C | Corner bedroom | 50 ft. |
| S | Small bedroom (library) | 16 ft. |
| U | Upper bedroom (office) | 47 ft. |
| B | Bathroom (full) | |
| W | Water closet (master bath) | |
| P | Powder room (1/2 bath) | |
| G | Garage | 28 ft. |
| E |
Exterior (patio) |
30 ft. |
| Total length |
354 ft. |
| Description | Price/Supplier |
| LQ - Leviton QuickPort | |
| LQ Wall Plate 6 Port | $0.85 ($8.48/10) Home Depot |
| LQ Mounting Box | $?.?? Home Depot |
| LQ Mounting Bracket | $0.59 ($5.90/10) Home Depot |
| LQ Snap-In 8 Conductor Cat5 | $6.97 Home Depot |
| LQ Gold Plated Snap-In F Connector | $2.49 ($34.88/10) Home Depot |
| LQ Gold Plated Snap-In RCA Connector B&R | $3.74 ($7.48/2) Home Depot |
| UK - Unicom Keystone | |
| UK MIOP1-MPU06-WT 6 Outlets Faceplate | $?.?? Sesco |
| UK MIOP5-UE8-WT RJ-45 Cat5e jack | $3.49 Sesco |
| UK MIOP1-CXFTF-WT F/F-conn | $1.58 Sesco |
| UK MIOP1-CXPTP-WT Phono/Phono | $1.75 Sesco |
| UK PATU5-048C-R 48-port Patch Panel - Rack Mount | $14.00 Sesco |
| RJ45 plugs (for patch cables) | $0.35 Digi-Key A9125-ND |
| RG6 F Connector | $0.42 Digi-Key CP-0260-ND |
| Switchcraft 3502A phono plug | $1.34 Newark 96F9615 |
| Category-5 cable | $0.06 ($62/1000ft) Graybar |
| RG6 (video) cable | $0.13 ($123/1000ft) Smarthome |
| 14-gauge 2-conductor (speaker) wire | $0.14 ($36/250ft) Home Depot |
| RJ45 patch panel |
i recently wired my new house for ethernet and phone.
i got my
stuff from Graybar Electric, a national chain that many contractors
buy their stuff from. they have a location in Parsippany off
Rt46
(you can get to it by taking FP's Ridgedale Ave north through East
Hanover and making a left after you go over I-80). their prices
were reasonable:
Siemon's 50 row connecting block
$5.32 (for phone)
Hubble 6-pin snap-in phone jack
$2.86
Hubble 8-pin snap-in Cat5 jack
$3.74
Hubble 2 port wall plate
$1.24
Berk-Tek 1000' box Cat5 cable
$61.77
for the cat5 from the jacks, i decided it wasn't worth the extra $$$
to have an RJ45 patch pannel since i don't plan to change the configuration
(so i just plug in the cables from the wall outlets directly into the
hub).
| RG6 Coax Strip Tool | $14.95 |
| RG6 Coax Crimper | $29.95 |
| Twisted Pair Spludger Tool | $0.89 |
| Punchdown Tool with 110 Blade | $34,95+$14.95 |
| Remote RJ45/BNC Cable Tester | $44.99 |
I bought the tools from HomeTech Solutions and the cable tester from cablesonline.com. In addition to wire cutters and strippers, these are essential tools. The spludger tool really helps wiring RJ45 patch panels and even the "tool-less" Unicom RJ-45 Cat5e jacks! I also have a RJ45 crimper to make patch cables, and adapters for the cable tester to test coax and speaker wiring.
These tools can be borrowed by members and friends of Department HA1110000.
Hints: If the Cat5 cable has a nylon strain relief strand, trim this off before punchdown so that it is not in the way. Use the spludger tool to push the wires into the slots before punchdown.
Important: Before pushing on the connector, make sure that there are neither wire strands nor shielding near the center conductor. Scrape anything away from the center conductor so that the white insulator is completely clean. After pushing on the connector so that the insulator is flush with the inner face, check again to make sure that the insulator is clean and that there are no loose wire strand nor shielding. Test with the cable tester after crimping.